How to fix SSD not showing up on Mac?
Why is SSD not showing up on Mac?
SSD not showing up on Mac, whether it's new or used, is prone to happen for some reason. A person bought a Samsung 840 EVO drive to upgrade, but the laptop doesn't detect the drive. The same issue can occur with SanDisk and Crucial as well. SSD not showing up on your Mac can happen for some following possible problems:
- Connection Issue: The most common reason for SSD not showing up on Mac is the connecting cables of your SSD may be loose, worn, or damaged. Connection issues can be solved very easily.
- USB Port issue: Another reason can be a faulty USB port. If your USB Port is not working, your SSD is not going to show up.
- MacOS problem: If the reasons above are not applicable in your case, then check your macOS problem is necessary.
- SSD Problem: Though it is not such a common reason, it can also happen that your SSD is broken or corrupted, and for that, it's not working and not showing up.
6 Fixes for SSD Not Showing or Detected by Mac
Most of the time, you can fix your SSD connection or recognition problems by yourself. Usually, the data is unaffected while fixing the SSD connection or recognition problem. However, SSD data sometimes can be endangered because of some troubleshooting processes. To avoid that, you need to backup your unrecognized external storage first. In this case, if you don't have any backup at hand, you need to find a reliable and capable Mac data recovery program to scan and export important data.
The following solutions will help you to fix the SSD not showing up issue.
Fix 1. Check If the USB Connection is Loose
Step 1. Connect the SSD with a different USB and check if the cable is working.
Step 2. Check the compatibility of your adapter by checking whether your SSD is using SATA I, II, or Ill.
Step 3. Try to use a different SATA USB adapter, and make sure that it works in a different drive.
Step 4. If it's a C-type drive, try to connect the SSD to your Mac directly.
If your unrecognized SSD is a Samsung T5/T3 SSD, and "System Extension Blocked" and "No Samsung Portable SSD is connected" messages are showing to you, then go to System Preferences, then click on Security & Privacy, after that, choose Allow button next to the message: System software from developer "Samsung Electronics" was blocked from loading.
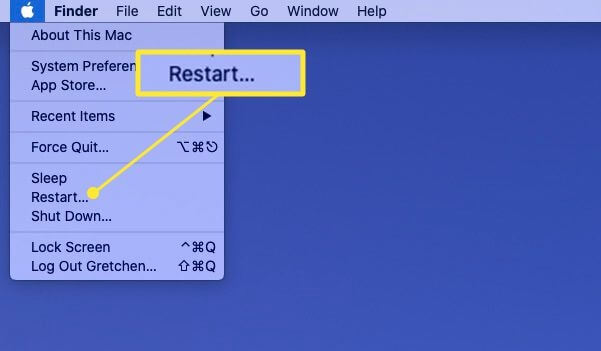
Fix 2. Restart Your Mac and Reconnect Again
Mac external SSD not showing issues are caused by the system issues. But it can be fixed by restarting your Mac. Restarting the Mac will refresh its Operating system's memory and give it a fresh start, which works when the USB port is busy. Simply choose the "Apple menu" > "Restart".
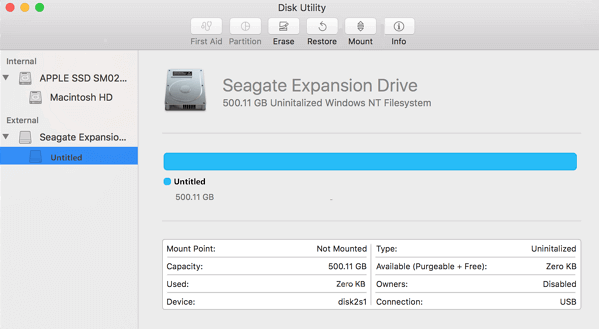
Fix 3. Mount SSD in Disk Utility
When SSD is not showing up on Mac, first check if the SSD is found in Disk Utility. If it can be found in Disk Utility, make sure that the drive does not have any hardware problem, and you can mount and repair the SSD in Disk Utility. But if you can't find it listed in Disk Utility, the SSD might be physically damaged.
Step 1. Go to System Preferences > Disk Utility.
Step 2. Make sure that the external disk is listed in the left sidebar.
Step 3. Highlight your hard drive and select Mount. It should now appear under Devices in the Finder.
If this SSD is used on other computers for some time and now it's not showing up by macOS, the file system of the SSD is either corrupted or unsupported; you need to recover lost data from this SSD and reformat the drive.
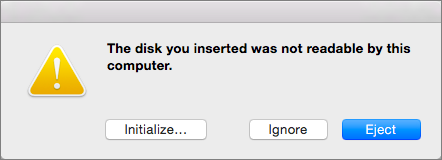
If SSD is new and it is not showing up, you can't see the partitions of the SSD in Disk Utility, but you receive a message "the disk you inserted was not readable by this computer". In this case, make sure you do not have any data on this drive and then initialize it in Disk Utility by erasing it.
Note: Mac Operating System will not mount the drive in writable mode if your SSD is using Windows NTFS format. You can download an NTFS for Mac tool to write to an NTFS drive.
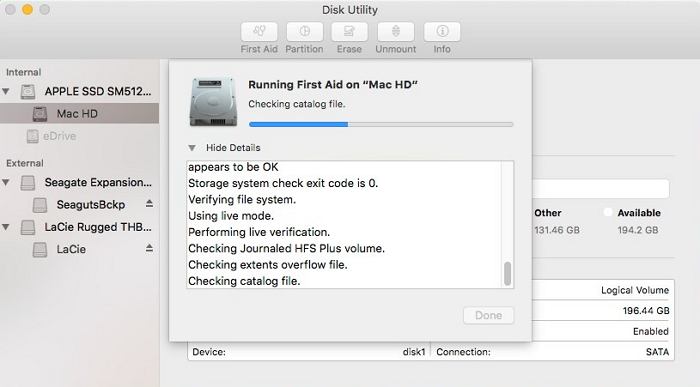
Fix 4. Repair SSD Errors with First Aid
If the SSD is mounted, but still not showing up on your Mac, there might be some hardware errors. In this situation, you can use a Mac built-in feature - First Aid, to self-troubleshooting the SSD error. Here are the detailed steps of how to use First Aid:
Step 1. Launch Disk Utility.
Step 2. Select the grayed-out SSD located at the left sidebar.
Step 3. Hit the "First Aid" on the top.
Fix 5. Advanced Repair SSD by Using Terminal
When Disk Utility fails to repair your SSD, try Terminal commands to fix this problem. Here are the steps you can try.
Step 1. Go to Finder > Applications > Utilities.
Step 2. Double-click on Terminal to launch the application.
Step 3. At the command, type diskutil list > hit Return. Note the identifier of the SSD.
Step 4. Type diskutil verifyVolume SSD_ID> hit Return.
Use SSD identifier if your SSD is startup disk. Otherwise, type the SSD identifier as noted previously. If no error appears, SSD repair could not help. But if your Mac drive is corrupted and it needs to be fixed, then type in diskutil repairVolume SSD_ID and hit Return.
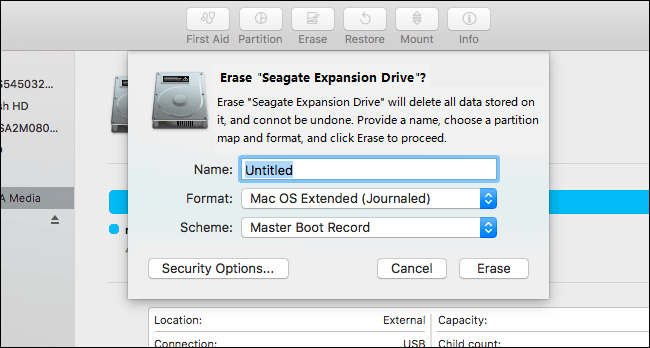
Fix 6. Format Unrecognized SSD on Mac
If you have tried all the fixes above, and still not worked. There is a last resort you can try, which is to format your SSD. But formatting the SSD would erase all data on it, so before formatting, please make sure you have backed up or recovered all useful files.
Step 1. Launch Disk Utility.
Step 2. Select the SSD on the top left side.
Step 3. Click on "Erase".
Step 4. Complete related information and click Erase.
How to Recover Data from Formatted SSD on Mac?
As mentioned before, formatting a disk on Mac can bring a total data loss to you. If you don't get the chance to back up the SSD, what else can you do to get back your data? Here is one chance for you, apply data recovery software like Deep Data Recovery for Mac.
What does the Deep Data Recovery for Mac do for you?
Deep Data Recovery for Mac is a reliable data recovery software that works to scan and recover lost or deleted files from hard drive, external drive, fusion drive, USB, camera, memory card, or other storage devices. It only needs three simple steps for every user to scan and recover lost data. Moreover, if you have damaged images or videos, this tool will automatically repair them during the scanning process.
After all, Deep Data Recovery for Mac is worth trying. Download the software from the button below, and follow the guide to see how to recover your lost data.
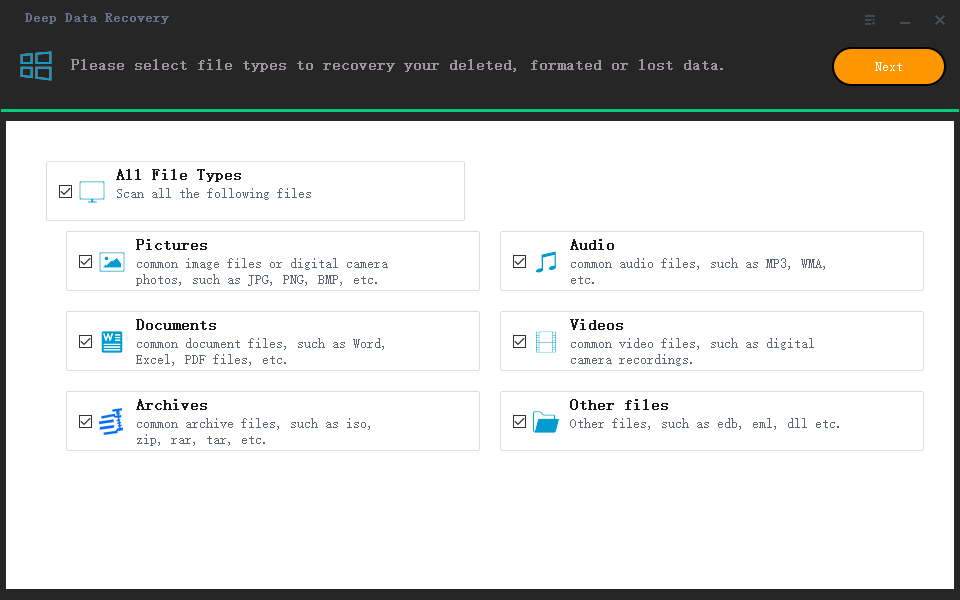
Step 1. Launch Deep Data Recovery. Select file types and click "Next" to start.
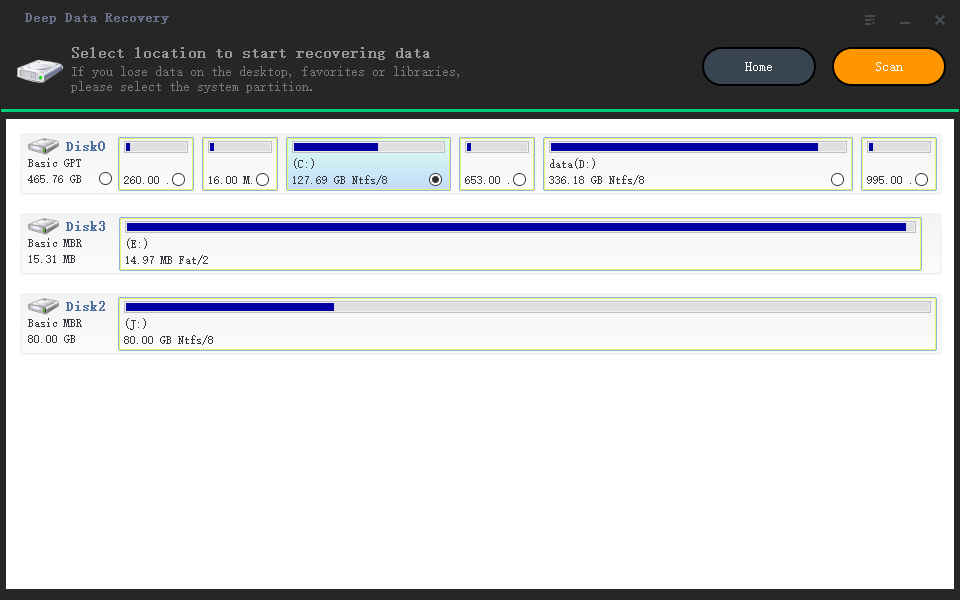
Step 2. Correctly connect your external hard drive to your Mac. Launch Deep Data Recovery for Mac, select the external disk and click "Scan" to let the software search lost files on it.
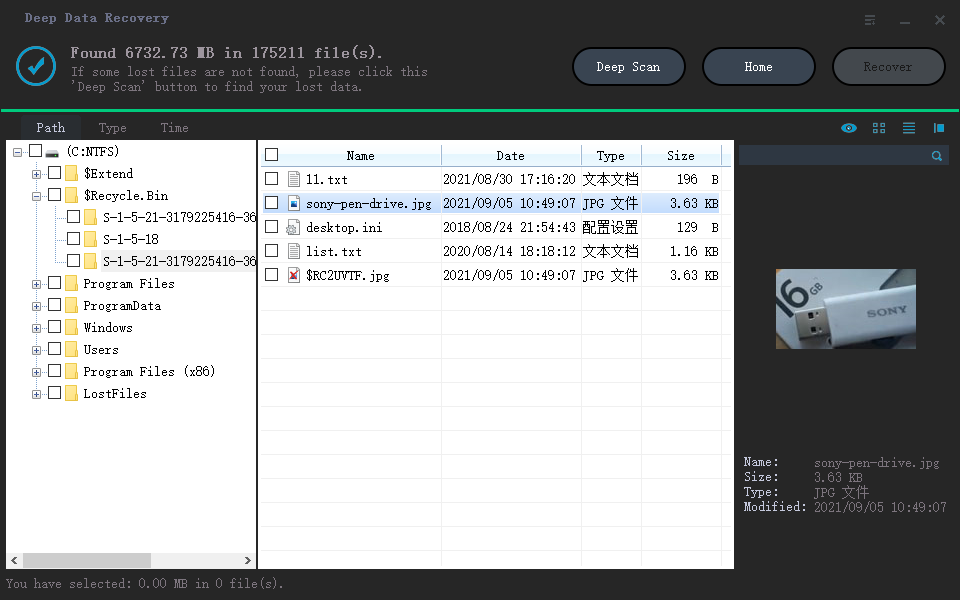
Step 3. After a quick scan and deep scan, all files will be presented in the left panel in the scan results.
Step 4. Select files you want to recover and click the "Recover" button. Don't save the recoverable files to the external hard drive in case of data overwriting.
Note: Data recovery chances on a Trim-on SSD can be greatly reduced. It's due to the Trim technology that tries to improve the SSD usage and performance.
Fix 'The disk you inserted was not readable by this computer' on Mac
Easy and efficient methods to fix 'the disk you inserted was not readable by this computer' error on Mac are offered here.
Related Articles
- How to Recover Permanently Deleted Files on Mac with Free and Paid Solutions
- NTFS Recovery: Recover Lost Data from NTFS Partition
- Mac Not Recognizing External Hard Drive #6 Solutions#Data Recovery#
- Fix 'The disk you inserted was not readable by this computer' on Mac