How to Recover a Replaced File on Mac
How to Recover Accidentally Replaced Word Files
Chances are that we made a terrible mistake beyond careless file deletion or disk formatting, for example, accidentally replaced a file by the other new file with the same name. Though macOS would certainly warn you that the file with this name has already existed, you just don't stop thinking and hit the Replace button. Usually, for the overwritten Word documents, users can search temporary files in Finder. Whereas, for other files and folders like pictures, texts or videos, you have no choice but to restore them to previous versions via Time Machine backup or third-party Mac data recovery software.
| Workable Solutions | Step-by-step Troubleshooting |
|---|---|
| #1. Recover from Time Machine | Connect the Time Machine backup disk to your Mac > open and locate the backup file...Full steps |
| #2. Recover with Third-party Software | Download Deep Data Recovery for Mac > choose the location to scan > recover...Full steps |
Things turn out to be desperate. However, it doesn't mean that there is nothing we can do. Here, we gathered two possible ways and step-by-step guides for you to recover replaced and overwritten files on Mac.
#1. How to Recover Replaced Files on Mac from Time Machine
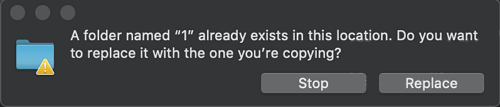
"Yesterday, I tried to move some files to my external hard drive, I found there was a folder titled with the same name. Mac prompted a question 'A folder named * already exists in this location. Do you want to replace it with the one you're copying?' and I stupidly hit 'Replace'. I hit cancel but it's too late. And it seemed that I had replaced some files in the folder. Is it possible to undo the file replace and recover overwritten files on Mac? If yes, how can I do it?"
Prior notice to recover a replaced file on Mac:
1) When you replace a file with the same file format and the same file name, the chance to restore a single overwritten file is null.
2) When you replace a folder with the same folder name, files in both two folders will be combined, saving different files and replacing files with the same names (new file overwrites the old one in the destination folder). Normally, you'll only lose the replaced files. And yes, the chance to retrieve overwritten files is still null.
To recover overwritten files from Time Machine:
If you are an early bird who creates a backup of important files on your Mac computer, and when you find you replaced or overwrote an important file or folder on Mac, your best choice is to recover overwritten files from Time Machine backup.
Once again: the precondition of restoring replaced files from Time Machine backup is that you've created a backup of those files in advance.
It's easy! You can simply find the containing folder of overwritten files from the backup by using Time Machine:
Step 1. Connect the Time Machine backup disk to your Mac computer and enter Time Machine by clicking the Time Machine icon at the Status menu on Mac.
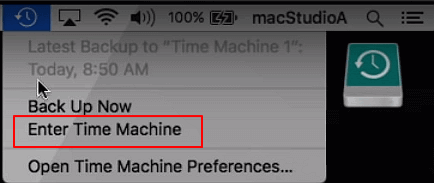
You can also click "Finder", and then open the "Time Machine" application.
Step 2. On the bottom and the right corner of the screen of Mac, scroll the Timeline to find the date and time that you did a backup through Time Machine.
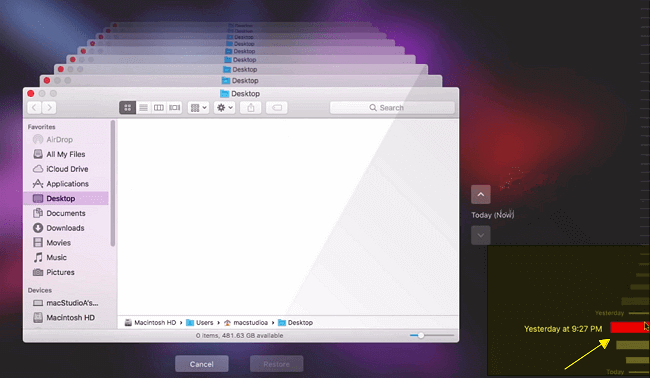
Also, you can click the up arrow next to the Time Machine window to find the right back up. You can double-click a specific file or folder to check if the files are what you want to restore from the backup.
Step 3. If the overwritten files are in Time Machine backup, you can select them and click "Restore" to retrieve the old versions of overwritten files.
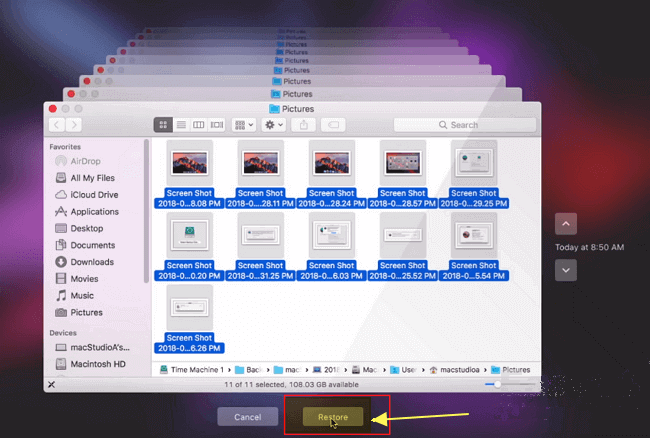
The selected files (which were replaced on Mac) will be restored from the Time Machine backup to the original location on your Mac computer. And you can continue using the restored files again.
#2. How to Recover Replaced Files on Mac with Deep Data Recovery
"I emptied my USB stick and transferred about 4.8GB new documents and pictures onto it. But later this evening, I found that I didn't back up the folder containing all my school training materials, I emptied it with all the data on the USB stick. Now all new files have replaced the old ones. Is it possible for me to restore the replaced files on a Macbook? I don't have any Time Machine backup."
Mostly, if you emptied a storage device such as a USB flash drive and saved new files on it, the old files will be replaced. Will you have a chance to restore the replaced files? Yes!
For example, you have a 100GB USB which is full of saved files, you emptied the USB and saved 50GB of new files there. The 50 GB replaced files cannot be restored. But the other 50GB lost files in the empty space are still available to be found and retrieved.

Prior notice to recover replaced files on Mac hard drive or flash drive:
1) When you deleted files on a storage device and saved new files on it, the replaced files in the occupied space can't be restored. But the lost file in the empty space can still be restored by using professional file recovery software.
2) If you are in such a case, you can either restore all replaced files from your Time Machine backup (if you had a backup) or turn to a professional Mac data recovery software for help (as shown below).
Best way to get overwritten files back on Mac:
If you are the one who lost data by emptying storage devices and replacing old data by saving new files, you'll need to use third-party Mac data recovery software as an alternative solution to recover replaced files from the empty space. Being powerful, safe and easy-to-use, Deep Data Recovery for Mac is your best choice. It allows you to recover deleted files on Mac and supports to restore multiple types of files such as pictures, videos, documents, music files, etc from Mac in three steps.
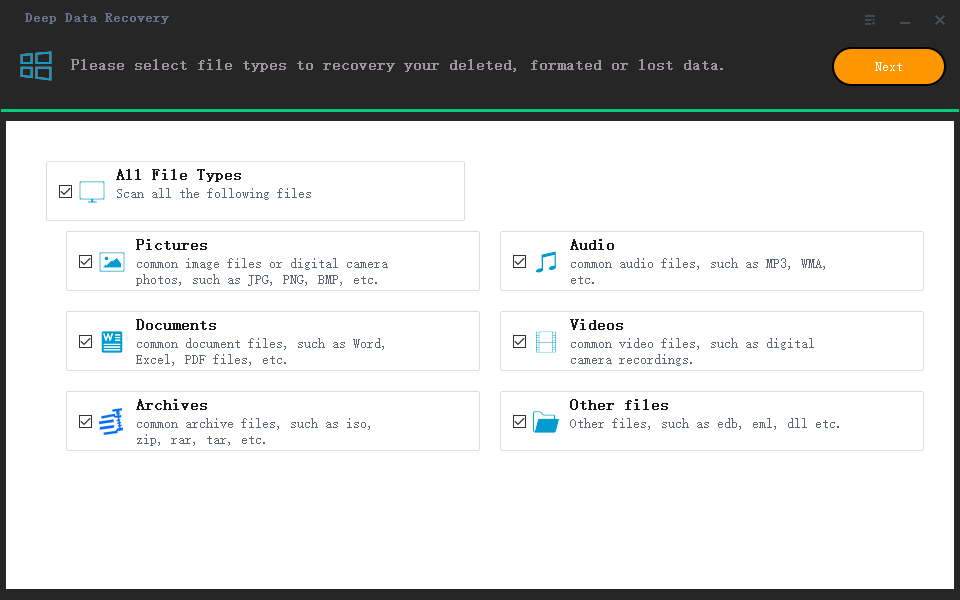
Step 1. Select the file types. Click the "Next" button.
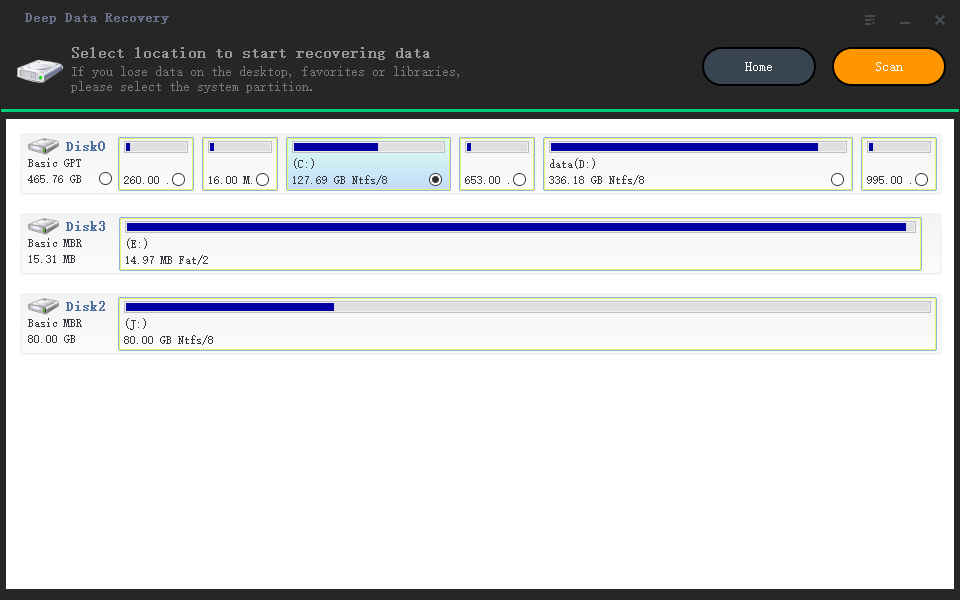
Step 2. Select the disk location (it can be an internal HDD/SSD or a removable storage device) where you lost data and files. Click the "Scan" button.
Step 3. Deep Data Recovery for Mac will immediately scan your selected disk volume and display the scanning results on the left pane.
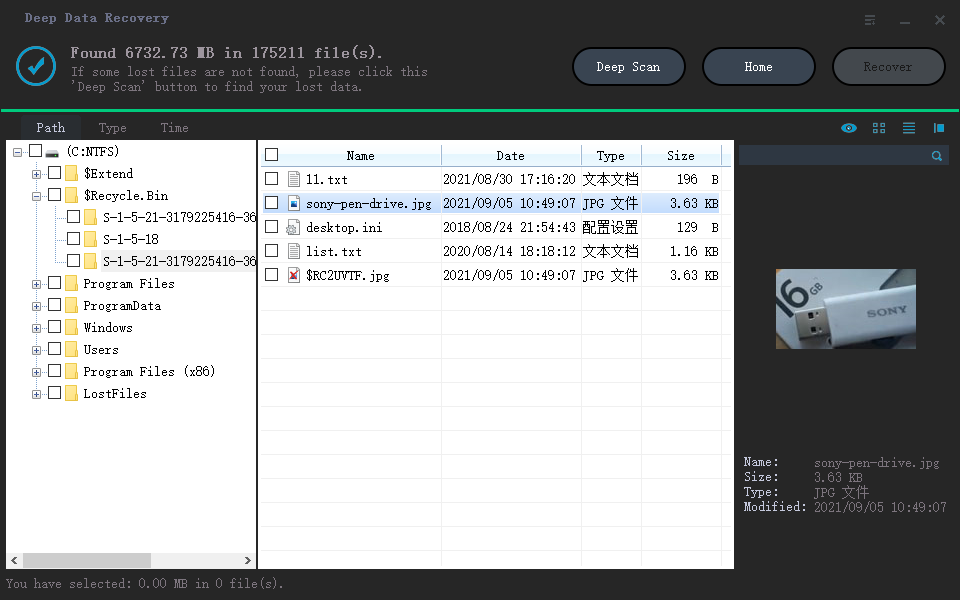
Step 4. In the scan results, select the file(s) and click the "Recover" button to have them back.
To Sum Up
Regarding the topic "how to recover replaced files on Mac", we collected two cases and gave corresponding solutions:
- Case 1 - Replaced a single file on Mac by mistake (Recover from a backup)
- Case 2 - Replaced files on a hard drive or USB stick (Recover from backup or third-party data recovery software)
Related Articles
- 6 Best Free Disk Drill Alternatives for Mac Data Recovery in 2022
- GetDataBack Mac & Windows
- What is Other on Mac Storage? Clear Other Storage Without Deleting Wrong Data
- How to Recover Deleted Photos from iCloud on Mac