How to Recover Folders Turned into .exe | Remove exe Virus
Folders changed to Application .exe, how to remove .exe virus from computer?
If the .exe virus infects you, and folder become exe file virus, follow these to remove folders with .exe application:
1. Install, update your antivirus application.
2. Delete all detected files. Now, the .exe folder is removed, and you need to show the original folders.
3. Open File Manager.
4. Go to the top menu, Tools > Folder Options. Select the View tab.
5. Check the "Show hidden files and folders."
6. Go to Start > Run, type cmd at the OPEN: box, and press OK. This will show the command prompt.
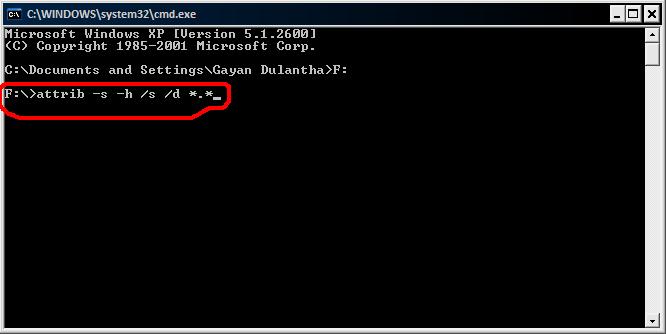
7. Using My Computer, view the drive of hidden folders
8. Go to Command Prompt and type these command lines to unhide all folders and files: attrib *.* /d /s -h -r -s.
See more items on how to remove .exe virus from computer.
Overview of .exe Virus
.exe virus malware is not new to most computer users. What we heard the most are applications.exe, app.exe, and newfolder.exe virus. The virus is mainly spread by mobile devices such as USB flash drives. And it will hide the real folder, make a fake executable file to do the folder to seduce the user to click, click to trigger the Trojan to infect more folders. What's worse, .exe viruses are said to be so dangerous that they can disable programs like Task Manager, Regedit, and Folder Options. If your devices have been infected by the .exe virus, you can follow the ways below to recover files from .exe virus and remove it thoroughly.
How to Recover Files from .exe Virus
Once your USB flash drive or computer has been infected with .exe. virus, the original folders will be hidden and turn into .exe files. So, to recover the virus infected files, you need to unhide all folders and files by using the methods below.
1. Change View Settings
- Open File Manager, go to the top menu, "Tools" > "Folder Options". Select the "View" tab.
- Mark the "Show hidden files and folders".
2. Use Command Prompt
- Go to "Start", type cmd, right-click "Command Prompt" and choose "Run as administrator".
- Type attrib -h -r -s /s /d *.* and hit Enter.
Manual execution of the command line is suitable for computer professionals, since incorrect commands can do more harm than good. Therefore, for security and usability, we strongly recommend you try an automatic command line alternative - Qiling CleanGenius. It is a practical tool that enables you to check and fix file system errors, enable/disable write protection and update your system with one-click instead of typing intricate command lines.
Follow the simple steps below to show hidden files with this 1-click-fix software.
Step 1. DOWNLOAD Qiling CleanGenius for Free.
Step 2. Start Qiling CleanGenius, choose "Optimization" on the left panel. Next, click "File Showing" on the right panel.
Step 3. Select the hard drive and click "Execute".
Step 4. After the operation completes, click the here link to check the hidden files.
3. Use Virus Attack Recovery Software (Most Effective)
If the above two solutions can't recover the files turned into .exe, don't despair, you still have the last but the most effective method to make it with ease. That is using Qiling hard drive recovery software. This reliable and professional virus attack recovery has so far helped a big number of customers to recover virus infected files. It is also competent to restore folders infected by the .exe virus from USB flash drive and computer's hard drive.
Now, download this data recovery software by clicking the download button below and follow the step-by-step guide to proceed .exe virus file recovery as soon as possible.
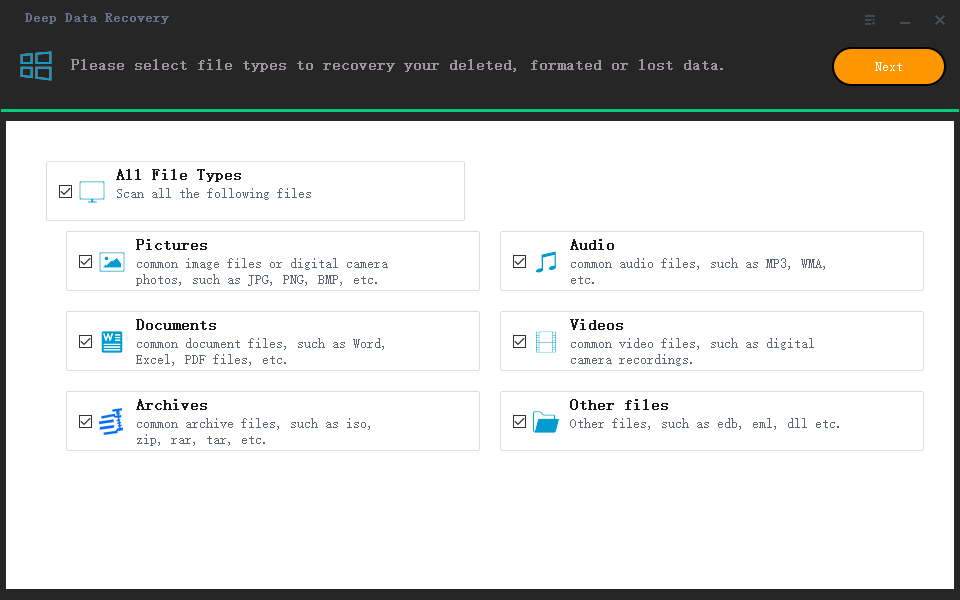
Step 1. Select file types and click "Next" to start
Run Qiling virus file recovery software on your Windows PC. Select file types and click "Next" to start.
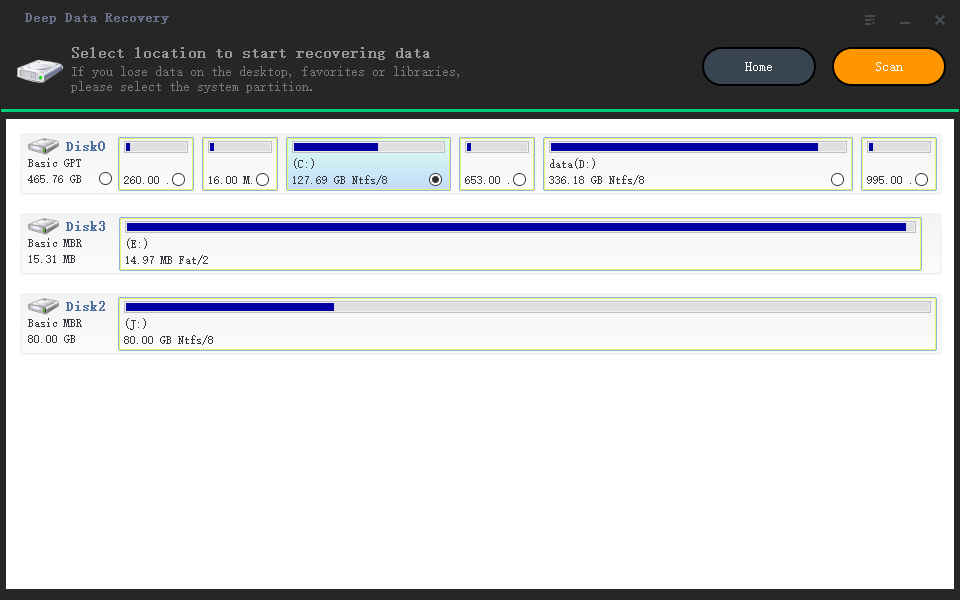
Step 2. Select the virus infected drive to scan
Select the disk attacked by the virus to scan for lost or hidden files. Note that:
- If it's an HDD where files were hidden or deleted by virus, it's better to install the software on a different volume or an external USB drive to avoid data overwriting.
- If the infected device is an external hard drive, flash drive or memory card, it doesn't matter to install the software on the local drive of the computer.
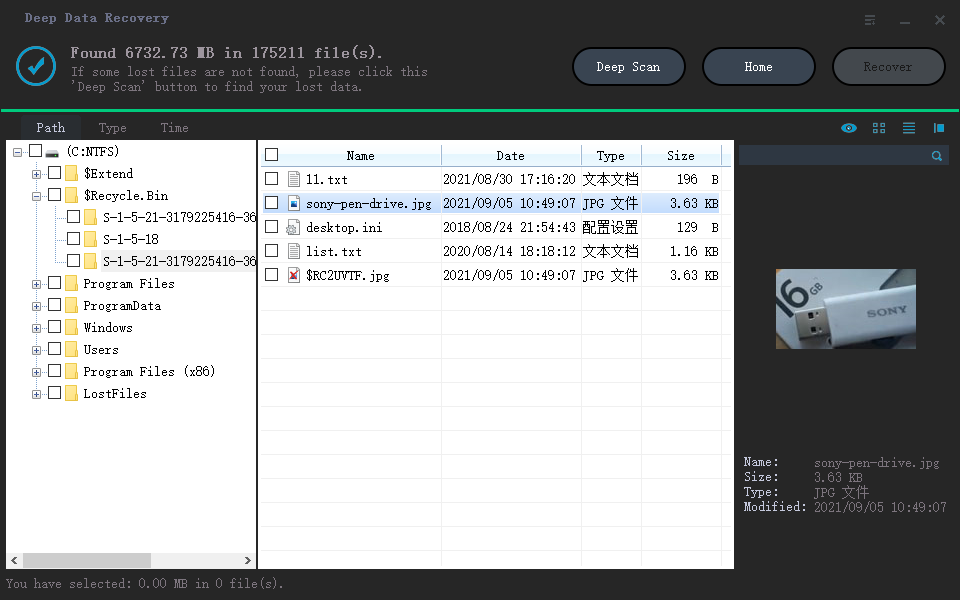
Step 3. Check all scanned results
Deep Data Recovery will immediately start a scan process to find your deleted or hidden files on the virus infected hard drive. To quickly locate the wanted files, you can use the Filter or type grouping feature to display only the pictures, videos, documents, emails, etc.
Step 4. Preview and recover deleted/hidden files
When the process finishes, you can preview the scanned files. Select the files you want and click the "Recover" button. You should save restored files to another secure location on your computer or storage device, not where they were lost.
How to Remove .exe Virus Manually
To remove .exe virus from the USB drive or the computer, go through the following the guide carefully.
Step 1. Run Command Prompt on your Windows 10/8.1/8/Vista/XP computer;
Step 2. Enter the following commands one by one. These will delete the preliminary stages of the virus.
taskkill /f /t /im "New Folder.exe"
taskkill /f /t /im "SCVVHSOT.exe"
taskkill /f /t /im "SCVHSOT.exe"
taskkill /f /t /im "scvhosts.exe"
taskkill /f /t /im "hinhem.scr"
taskkill /f /t /im "blastclnnn.exe"
Step 3. Re-enable Task Manager and Regedit after deleting the virus by entering the following commands one by one.
reg add HKCU\Software\Microsoft\Windows\CurrentVersion\Policies\System /v DisableTaskMgr /t REG_DWORD /d 0 /f
reg add HKLM\Software\Microsoft\Windows\CurrentVersion\Policies\System /v DisableRegistryTools /t REG_DWORD /d 0 /
reg add HKCU\Software\Microsoft\Windows\CurrentVersion\Policies\System /v DisableRegistryTools /t REG_DWORD /d 0 /f
Step 4. Go to "Folder Options" > "View" > "Advanced Settings" > "Show Hidden Files, Folders and Drives", and click "OK". Find the following listed files and delete them all.
C:\WINDOWS\SCVVHSOT.exe
C:\WINDOWS\SCVHSOT.exe
C:\WINDOWS\hinhem.scr
C:\WINDOWS\system32\SCVHSOT.exe
C:\WINDOWS\system32\blastclnnn.exe
C:\WINDOWS\system32\autorun.ini
C:\Documents and Settings\All Users\Documents\SCVHSOT.exe
Related Articles
- How to Mount ISO File in Windows 10/11
- Top 11 Best Photo Repair Software for PC/Mac
- Recover Deleted Chrome Downloads and Resume Canceled Chrome Downloads
- Fixed: Recover Lost Google Play Music Files