Best Data Recovery Solutions for Mac with T2 Chip in 2022
As Apple T2 Chip guards your new Mac computers' security, Qiling data recovery software with the other nine solutions is here to protect your Mac data.
In the following, you will uncover 6 solutions to restore your lost data encrypted by T2 chip on new Mac computers and other three tips to protect your Mac data safe. Pick up the best way to restore and keep your data safe on Mac.
The provided methods work on both 2022 new Macs and old Mac computers produced in 2019, 2018 with T2 chip, and some earlier.
Part 1. Can't Restore Data from T2-Secured Mac Computers? Something You Must Know
New Mac computers produced in 2018, 2019, 2020 and 2022 are all equipped with Apple T2 security chip, which profoundly improved in the levels of integration and security. Apple T2 chip secures Mac data but makes it more challenging to restore.
Here are something about Apple T2 chip that you must know, and you will learn why it's so tricky to apply standard ways to restore deleted or lost data on new Mac computers.
1. What Is Apple T2 Security Chip? What Does It Do?
The Apple T2 Security Chip is the second-generation of Apples' security chips. Based on Mac computers, Apple re-designed and integrated several controllers, including System Management controller, Image signal processor, audio controller, and SSD controller.
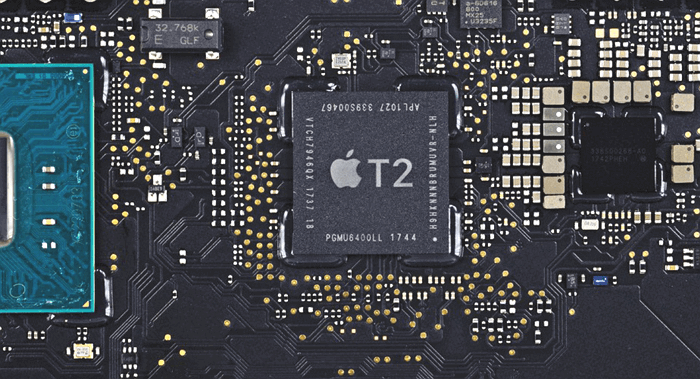
What does it do? T2 chip improves the security on Mac to a new level by securing Touch ID data, providing foundation for new encrypted storage and secure boot capabilities.
| The Good | The Bad |
|---|---|
|
|
2. T2 Chip Supported Devices
Mac computers produced in 2018, 2019,2020 and 2022 are installed with T2 chips:
- 2020/2022 New MacBook Air
- 2020/2022 New MacBook Pro 13
- 2020/2022 New Mac Mini
- iMac Pro
- Mac Pro (introduced in 2019)
- Mac Mini (introduced in 2018)
- MacBook Air (introduced in 2018, 2019)
- MacBook Pro (introduced in 2018, 2019)
3. Is It Possible to Recover Data from iMac/MacBook Pro/Mac Mini with T2 Chip?
T2 Chip Encrypts Mac Device, so it does Mac data. According to some data recovery providers, data recovery seems almost impossible on new Mac computers that are installed with the T2 chips.
However, it's not the end yet.
The answer to whether you can restore data from Mac that installs with T2 chips is Yes. Continue reading, you will find the best solution to restore precious lost data.
Part 2. 6 Best Data Recovery Solutions for Mac With T2 Chip
In this part, we collected six best and most practical data recovery solutions to assist you in bringing lost data back from your new Mac computers, like iMac, MacBook Pro, or Mac Mini.
The earlier the resolution is presented, the high success rate it will be in retrieving your lost Mac data.
#1. Qiling Mac Data Recovery Software - Recover Lost Data from T2-secured Macs [Exclusive]
Works to: The only Mac data recovery software that supports scanning and restore encrypted data on Mac computer with the T2 chip, also support restoring data on old Mac machines. No backup is required.
Best for: All levels of Mac users to restore lost encrypted data on Macs with T2 chip.
Recommend: Deep Data Recovery for Mac - Exclusive Provider of the Technology for Data Recovery on T2-Secured Macs.
Deep Data Recovery for Mac is the only Mac data recovery software that resolves the T2 chip data encryption issue at a technical level. Whether you deleted or lost Mac data due to formatting, virus attacking, etc., it enables you to scan and restore T2 chip encrypted data on Macs in a few simple clicks.
Feature List:
- Don't need to disable SIP.
- Directly scan T2-secured Macs.
- Instantly recover data from Macs with T2 chip.
- 3-step data recovery, no extra operation is required.
- The No.1 & the only software that resolves T2 chip data encryption issue, making direct data recovery possible.
The whole process of restoring lost files on T2-secured Mac devices is straightforward and easy. You don't need to do any extra operation.
Tutorial: T2 Chip Data Recovery on Macs with Deep Data Recovery for Mac
Follow the tutorial steps below to bring your lost data from T2-encrypted Mac immediately:
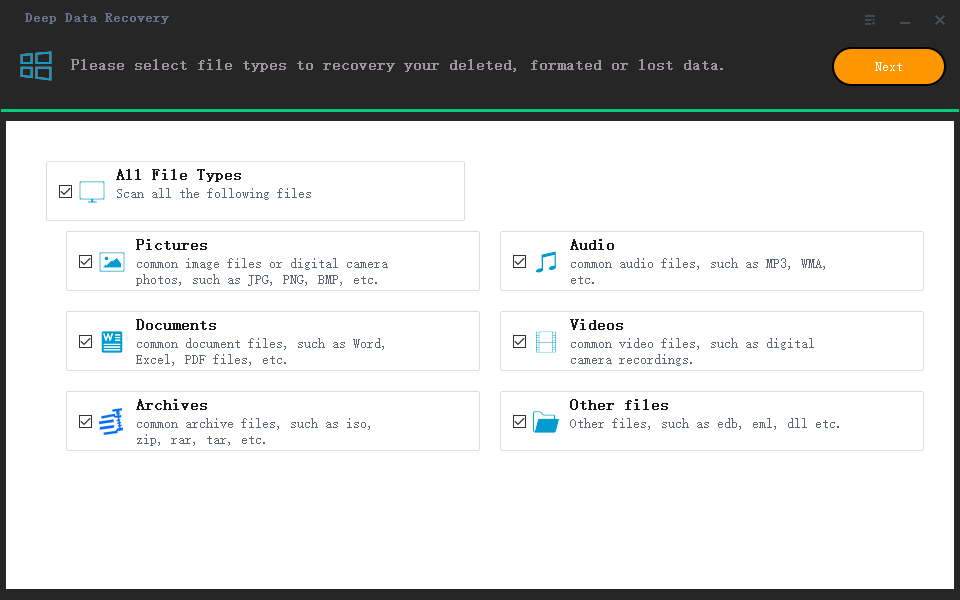
Step 1. Launch Qiling file recovery software on your Windows computer. Select file types and click "Next" to start.
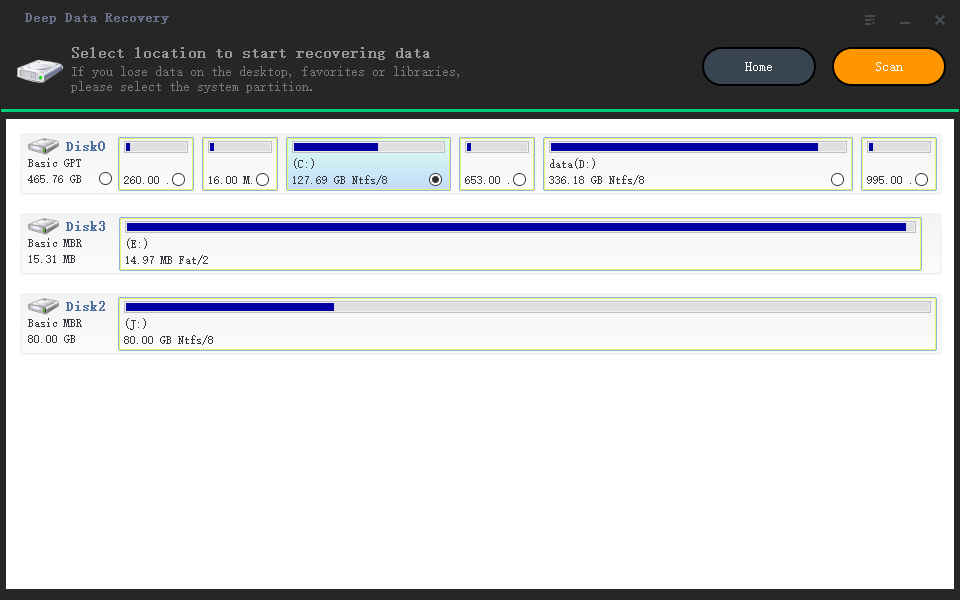
Step 2. Select the T2-secured volume where you lost data and files. Click the "Scan" button.
Step 3. Deep Data Recovery for Mac will immediately scan your Mac volume and display the scanning results on the left pane. No extra operation is required while scanning the T2-secured Mac volume and lost data.
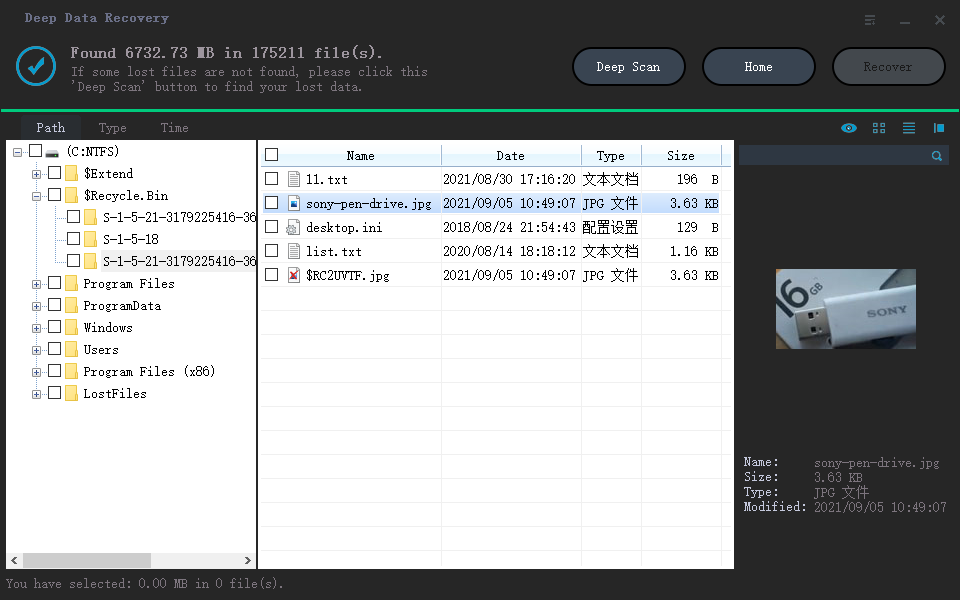
Step 4. When the scan completes, select and double-click the file(s) to preview and click the "Recover" button to get them back.
Note: Before making sure the Mac drive is safe, please save your data to another secure location, such as an external storage device.
Besides T2 chip data recovery, Deep Data Recovery for Mac also supports data recovery from more complex cases, such as APFS recovery, recovery from dead MacBook, recover deleted files without Time Machine, etc. Whenever you come across sudden data loss, don't hesitate to let this software help.
#2. New Data Recovery Process Introduced by Apple (for Macs with T2 Chip)
Works to: Data transfer from Macs with T2 chip to another Mac computer, mainly for Apple's repair staff.
Best for: Apple repair staff to repair problematic Mac with T2 chip and restore data.
Apple recently introduced a new data recovery process that supports data transfer for Macs with T2 chip when its repair staff needs to repair a Mac computer's logic board.
Note: If you are not a professional repair staff, revert to Method 1 and use Mac data recovery software for help.
Here is how the process works:
Precondition: The logical board of Mac computer with T2 chip is at least partially functional.
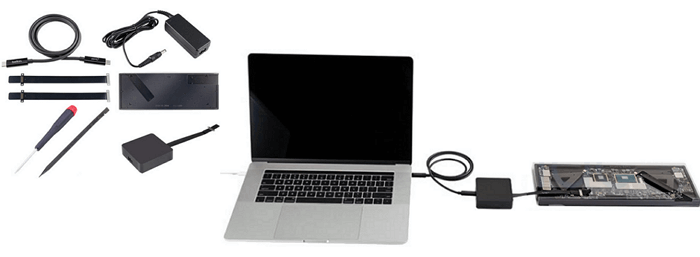
Required Tools:
- A new functional host Mac computer
- A Thunderbolt (USB-C) to Thunderbolt 3 (USB-C) or Thunderbolt 3 (USB-C) to USB-A cable
- An external hard drive
Step 1. Use Apple's tool to partition the external hard drive. (10-20 minutes)
Step 2. Connect the host Mac computer, the iMac/MacBook Pro/Mac Pro, and the external hard drive via the Thunderbolt cables.
Step 3. Switch the malfunction Mac into DFU mode, use Apple's internal diagnostic tool to initiate the data recovery process.
Data will be transferred from the source Mac computer to the host Mac machine. Apple notes that data transfer depends on the amount of data, and it could take up to two or more days.
#3. Trash Recovery
Works to: Undo Mac Trash delete, drag deleted Mac files from Mac Trash.
Best for: Mac beginners, simple file deletion cases.
Step 1. Open Mac Trash Bin on your desktop, find the files that you dragged into the Trash.
Step 2. Drag the files you want to recover back to the desktop. Or you can right-click on the file and select "Put Back".
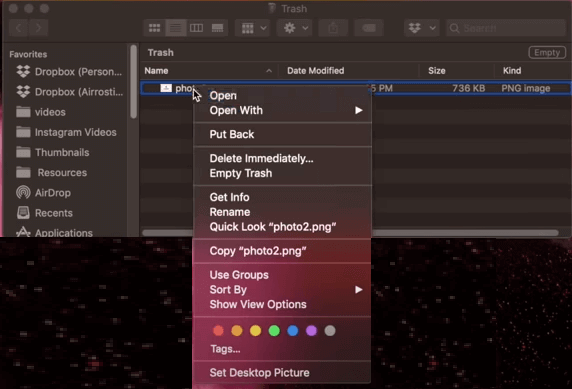
Files will be returned to their original locations on your Mac.
#4. Time Machine Backup Recovery
Works to: Recover lost Mac data from Time Machine backup, free.
Applies to: Mac users to recover data from both old and new Macs with or without T2 chip.
Time Machine backup recovery only works when you have created Time Machine backup in advance. When you lost data on Mac, you can follow tips here to bring data back immediately:
Step 1. Connect your Time Machine backup disk to Mac computer and make sure it's turned on.
Step 2. Open a window that contains or once contained the items that you want to restore.
For example, to recover a picture that was deleted from the Picture folder, start by opening the Picture folder.
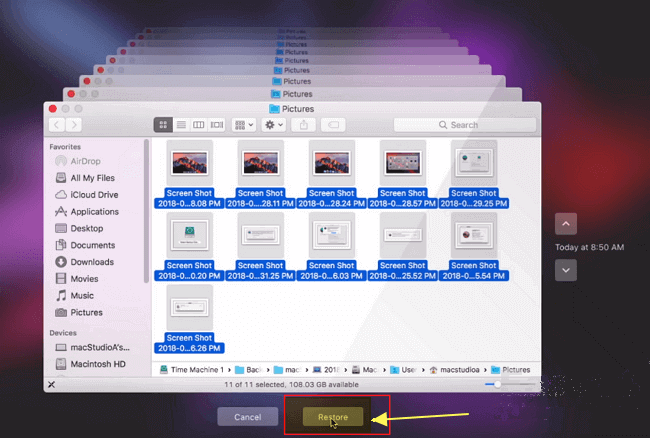
Step 3. Click "Enter Time Machine" from the Time Machine menu.
Step 4. Use the timeline to browse and find your lost files from the Time Machine backup. You can also use the onscreen up and down arrow to see the deleted or lost data.
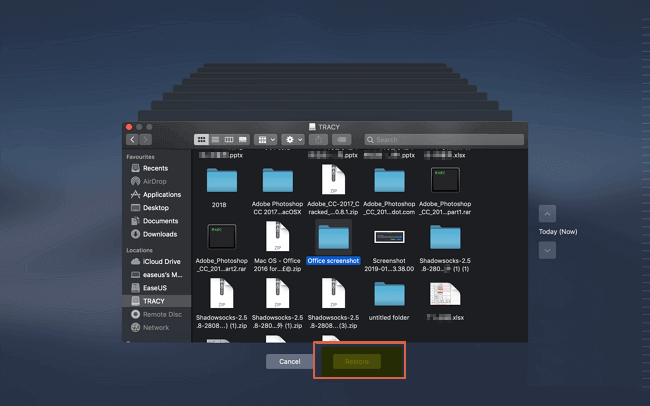
Step 5. Select items that you want to restore and click "Restore" to bring your files back.
#5. Run Local Snapshot Recovery via Time Machine
Works to: Quickly bring lost Mac data back from a local snapshot.
Applies to: Both new and old Mac users who have taken a local snapshot of Mac data on the hard drive.
Being similar to Time Machine backup, a local snapshot is taken by Time Machine, saving the backup on the local Mac hard disk.
Step 1. Enter "Time Machine" from the Time Machine menu.
Step 2. Use the timeline or up and down arrow browse and select an older version of the lost file or folder.
Step 3. Press the "Space" bar to preview and see whether it's the one you want.
Step 4. Click "Restore" to restore the selected file.
#6. iCloud Backup Recovery
Works to: Restore lost Mac data from iCloud backup without limit.
Best for: Mac users who have iCloud storage for saving Mac data backup.
No matter you are a new MacBook or Mac Pro user or an old Mac computer owner, you can safely restore deleted or lost files from iCloud on Mac.
Here are the steps:
Step 1. Go to iCloud.com and sign in with your account and password.
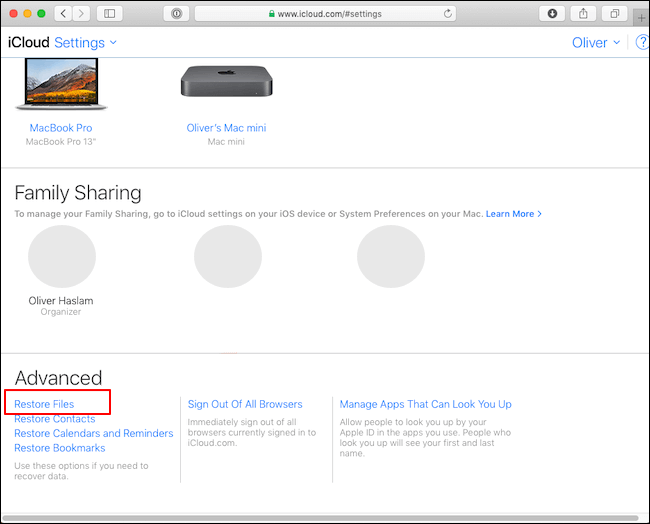
Step 2. Click iCloud Settings and scroll to the bottom, click "Restore Files" under the Advanced section.
Step 3. Tick the boxes of your deleted files on Mac, and click "Restore".
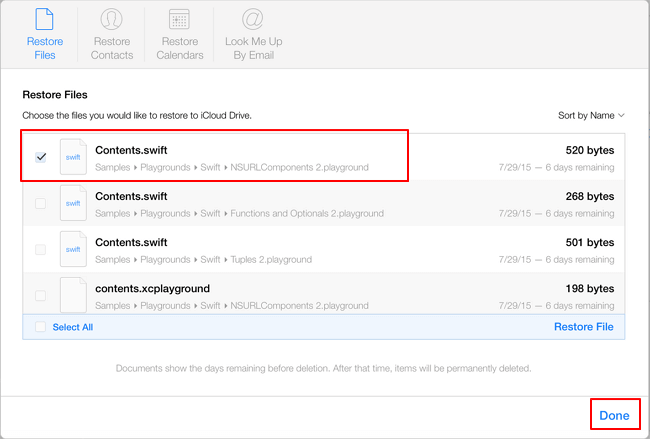
Once you finish the process, you can then download the deleted files back on your Mac computer again.
In this part, we collected 6 practical resolutions to help you effectively restore deleted or lost Mac data on both old and new Mac computers. Whether you are having T2 chip installed or not, data recovery is as easy as presented above.
Part 3. Tips to Guard Data on T2-secured Mac Computers
Aside from offering practical solutions to help you perform immediate data recovery on new Macs that are secured or encrypted by T2 chip, we also collected 4 tips that can help you better guard your Mac data besides T2 chip encryption.
With the following 4 tips, data recovery will be much easier and you can never worry about losing data on Macs:
#1. Open FileVault
FileVault is encryption access that Apple uses to encrypt the startup disk on Mac. By turning it on, T2 chip will start encrypting the Mac disk.
Here is how to open it:
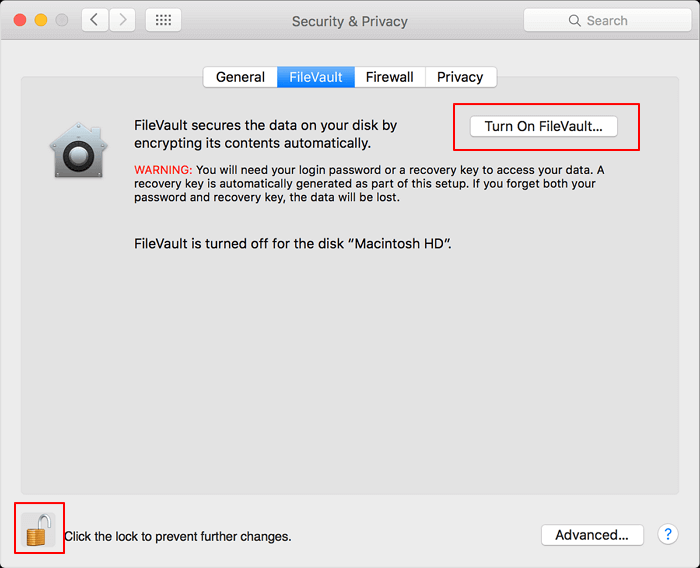
Step 1. Go to System Preferences, click Security & Privacy.
Step 2. Click the FileVault tab, and click the Lock icon at the left corner.
Step 3. Enter an administrator's name and password. Then click "Turn On FileVault".
Note that this will help to guard your Mac device but data recovery may be more difficult. If you have turned on FileVault and lost data, Qiling Mac data recovery software will help.
#2. Back-Up Mac Data using Third-Party Backup Software
An effective way that you can apply to protect and guard the Mac data is to apply third-party Mac backup software for help.
Qiling Backup for Mac is capable to fully back up or selectively back up your Mac data to an external hard drive with ease. Your backup recovery won't be restricted by the T2 chip encryption.
Here are the steps to back up your Mac:
Step 1. Launch and run Qiling Backup for Mac.
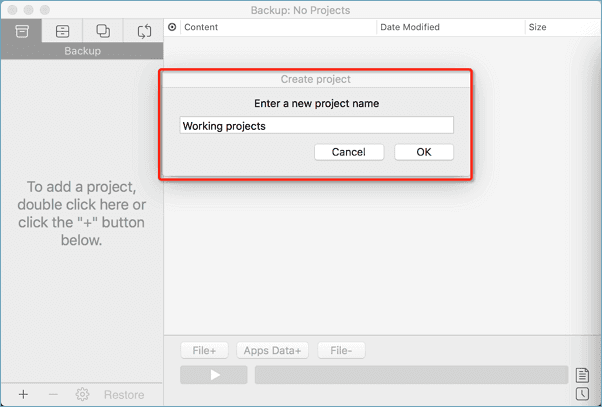
Click the first Backup tab or simply click the + button in the bottom-left corner to create a backup project - name the backup project and click OK.
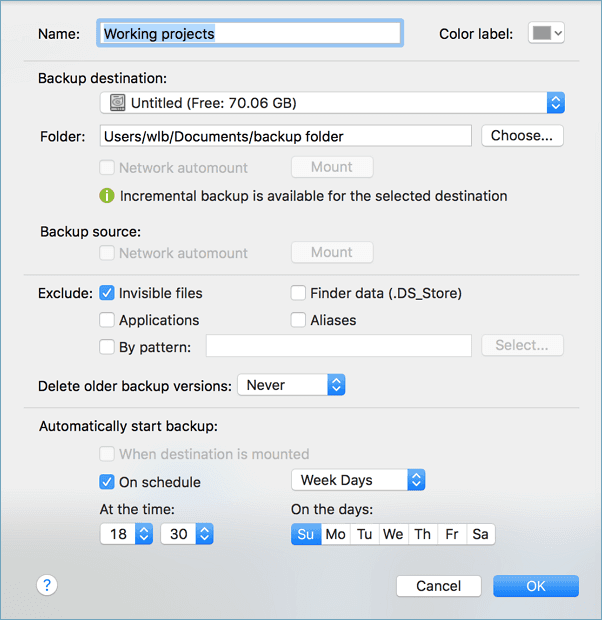
Step 2. Set up the backup destination where you want to store Mac files as backups, automatic backup frequency, etc, and click OK.
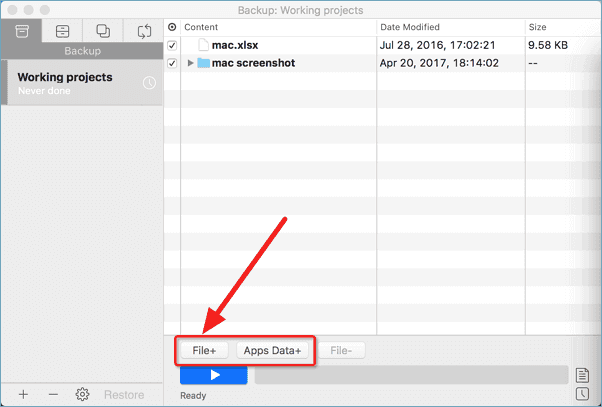
Step 3. Add files and folders to the backup project.
Click File+ to selectively choose files and folders to add to the backup and click the blue start button to back up your Mac to another drive or external device.
#3. Use Time Machine
Time Machine is a Mac built-in utility that enables Mac users to protect Mac data on their own and save data to a local disk or to an external storage disk.
To save your Mac disk space, we suggest you create a shadow copy of your Mac data to an external hard drive. Here are the steps:
Step 1. Connect an empty external hard drive to Mac.
Step 2. Click "System Preferences" on the Apple menu, and tick "Time Machine".
Step 3. Switch the Time Machine to "On" in the Time Machine dialog box, then click "Select Backup Disk".
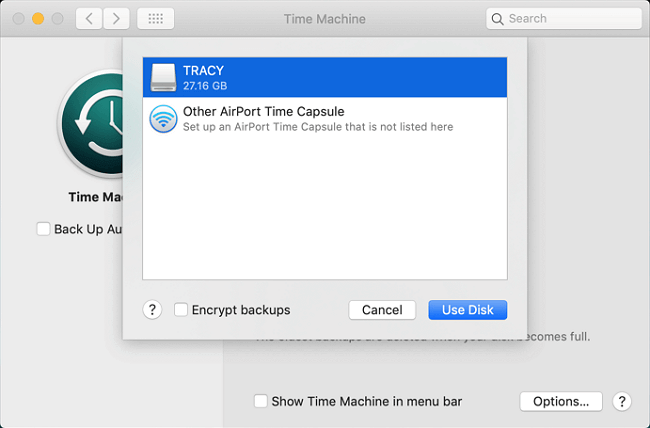
Step 4. Select the external hard drive to save the Time Machine backup files, and click "Use disk".
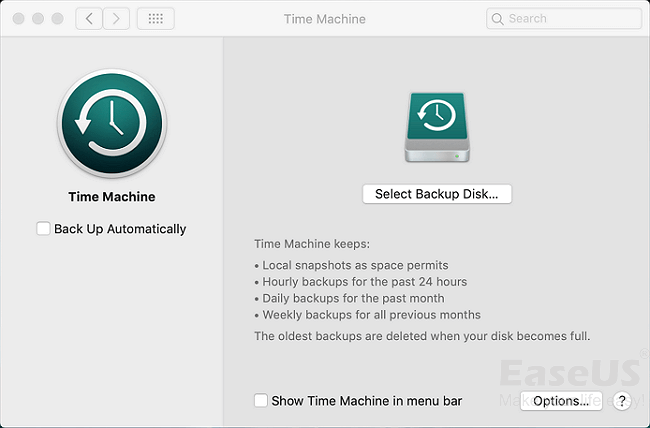
Step 5. Tick "Back Up Automatically" option to set Time Machine back up everything on your Mac automatically.
When you lost data on your new Mac, you can effectively revert to solution 4 in Part 2 to instantly bring your lost files back.
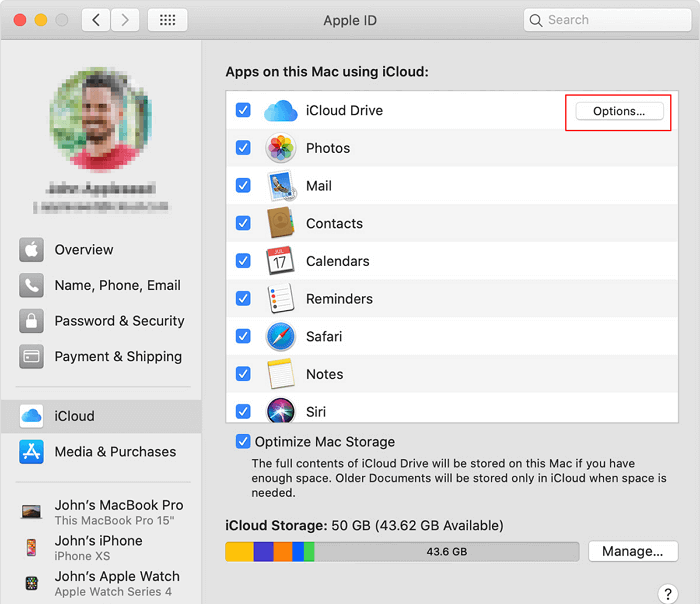
#4. Use iCloud
The last way that you can apply to protect your Mac data is to store Mac files on an iCloud drive as a backup.
Here are the steps:
Step 1. Go to System Preferences on Mac, click Apple ID.
Note that macOS Mojave and earlier users don't need to click Apple ID.
Step 2. Sign in with your Apple ID and password if necessary.
Step 3. Select iCloud Drive and click "Options" next to iCloud Drive.
Step 4. Choose "Desktop & Documents Folders" and click "Done".
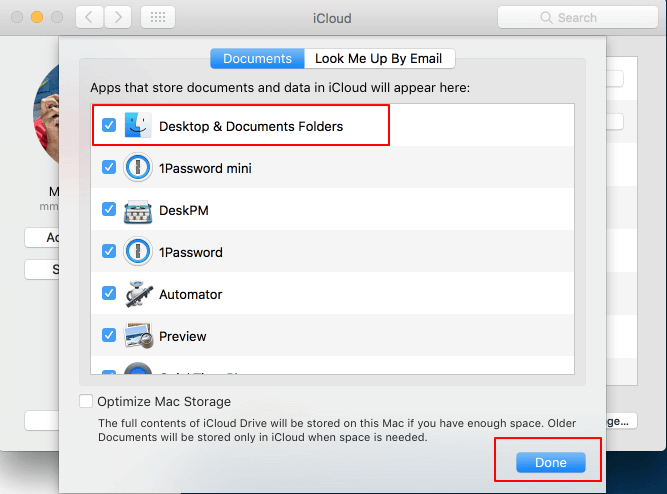
When you finish the process, you have successfully stored your Mac data to the iCloud drive. You can refer to the iCloud recovery method in Part 2 for help when you lost any files.
Part 4. Further Related Questions and Answers
In Part 2 and Part 3, we collected ten resolutions to help the latest Mac users to protect and restore Mac data on their own efficiently. Even though T2 chip encrypts the Mac, data recovery is still possible.
Here, we also list some other top queries that most Mac users asked online that you may like to know. Read and find your answers here:
1. How do I recover data on Mac without Time Machine?
You may turn to a reliable Mac data recovery software for help when you lost data on Mac but didn't create a Time Machine backup.
Third-party data recovery software like Deep Data Recovery can effectively scan and find everything you lost on Mac without Time Machine backup in a few clicks. It also works on the latest new Macs with a T2 chip.
2. How do I get data off a Mac that won't boot?
There are two ways that you can get data off when a Mac doesn't boot.
One way is to remove your Mac disk and reconnect it to another running computer, open the drive and save data.
The other way that you can try is to create a WinPE bootable disk and apply reliable Mac data recovery software like Deep Data Recovery for Mac to recover data from dead or unbootable Mac.
For more details, follow to Recover Data from Dead MacBook Pro for help.
3. Can you recover files from a water-damaged MacBook?
Yes. When your Mac or MacBook computer gets drowned and cannot boot anymore, you can either try to take it to a local Apple store for repair or data recovery.
The other way you can try is to remove the Mac hard disk and connect it to another computer and check out if you can access all the data.
Conclusion
When you are getting data recovery problems in 2020/2022 new Macs, such as iMac, Mac Pro, MacBook, MacBook Pro, Mac Mini, etc., don't worry. It's Apple's new security chip - T2 which is encrypting the computer.
Although there is no way to remove or disable T2 encryption, data recovery is still possible. This page covers almost ten resolutions and tips to assist you in restoring and protecting data on Mac computers.
If you are using the latest Mac computer, introduced in 2018/2019/2020/2022, always take Qiling Mac data recovery software as your first choice for instant Mac data recovery It won't let you down.
Related Articles
- Full Guide: Easily Format Text on Mac without Making Mistakes
- [macOS Guide] | How to Reinstall macOS
- Fix Slow External Hard Drive on Mac
- Video Recovery on Mac | How to Recover Deleted Videos on Mac