macOS Update Ultimate Guide: How to Update OS on All Models of Mac
Every June, Apple will hold a WWDC (Apple Worldwide Developer Conference) conference to announce their team's software and technology progress in the past year. During this conference, Apple usually introduces the new version of operating systems in the Apple Ecosystem. For example, you could hear the news about the next macOS, iOS, iPadOS, watchOS, and tvOS. Generally, the new OSs would be released three months after the WWDC, so you could consider embracing the new features and UIs this Fall.
Ⅰ. What Is the Latest macOS?
For Mac users, updating to the latest macOS might add new features to your computer, improve the power efficiency, or fix problematic software bugs. But if you are not a geek paying a lot of attention to the tech conference, you might have no idea which one is the latest macOS and which one you should update. Here are the macOS releases in chronological order from the newest to the oldest:
- - macOS Ventura (13)
- - macOS Monterey (12)
- - macOS Big Sur (11)
- - macOS Catalina (10.15)
- - macOS Mojave (10.14)
- - macOS High Sierra (10.13)
- - macOS Sierra (10.12)
- - El Capitan (10.11)
- - Yosemite (10.10)
macOS Ventura (macOS 13) was first announced in WWDC 2022 and was not officially released until Fall 2022. So if you read this article before October 2022, your only updating choice is the macOS Monterey.
*The Features of macOS Monterey
Compared with its predecessor - macOS Big Sur, which has the most significant macOS redesign seen in years, macOS Monterey doesn't impact much on users' life than that of updating to macOS Big Sur. But one of the noticeable changes to Monterey is the universal control feature. With this, you can use a single mouse, trackpad, and keyboard across several mac devices, which highly improves the linkage of different devices in the Apple ecosystem.
More macOS Monterey new features including:
- Extensive sharing features let you play music and video in messages
- Media sent to you in Messages now available in other apps
- VPN-like relay hides your IP address when browsing
- Mail security features hide your IP address from advertisers
- Stereo-placement effects in FaceTime
- A new Focus feature fine-tunes Do Not Disturb options
Reference by: PCMag - Apple macOS Monterey Review
*macOS Monterey Compatibility
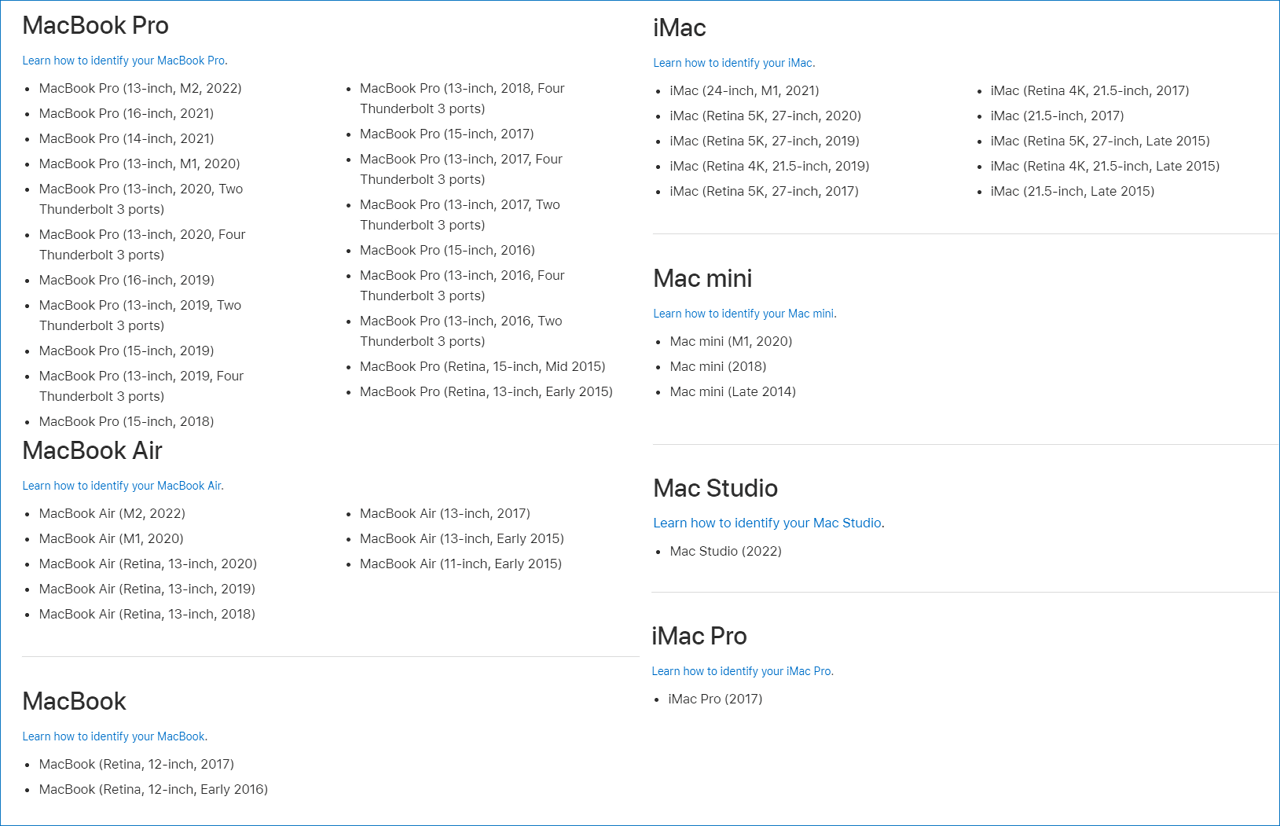
After checking the features of macOS Monterey, you should also confirm whether your device is compatible with this version. Here we list several common Mac models. See if your Mac is on the list.
LEARN MORE
You should consider more differences compared macOS Monterey with macOS Big Sur. Click here to learn about the ultimate comparison between macOS Monterey and Big Sur.
Ⅱ. macOS Update Process 1. Prepare Mac for OS Update
Knowing how to update your Mac to the latest system is good, but getting your machine ready is equally essential. Making sure your files are organized, all system settings are correct, and important files are backed up before your Mac is upgraded will improve your chances of a successful Mac update. Likewise, you also need to find out if your Mac is eligible for the update. Now here comes the first step - Check General Requirements.
Step 1. Check General Requirements
It's not enough to know if macOS Monterey is compatible with your Mac computer. You also need to check whether your current macOS version, memory, processor, and graphics card are eligible for the update. Following these two steps to get your Mac's specs:
- 1. Click the Apple icon on the top left of your Mac menu bar.
- 2. Select "About This Mac" from the drop-down menu.
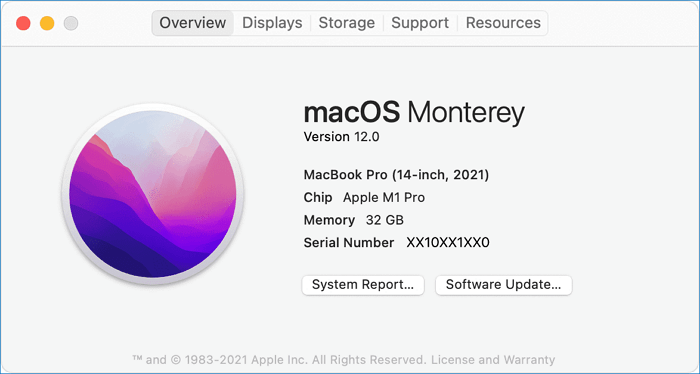
Here you can see your Mac's model, the chip, and the RAM (Memory). Switch to the 'Storage' tab. You could also check how much free space your Mac has. This is very important because if you're upgrading from macOS Sierra or later to macOS Monterey, it requires 26GB of available storage to upgrade. If upgrading from an earlier release, macOS Monterey requires up to 44GB of available storage.
Step 2. Clean Your Mac
The next preparation you should do is clean the junk files on your Mac. Now that you know macOS Monterey is compatible with your Mac and your Mac meets the system requirements, it's time to clean up your Mac before upgrading to macOS Monterey. This will ensure a smooth transition and avoid any potential issues.
Here are some tips on how to clean your Mac:
- 1. Uninstall any apps you no longer use.
- 2. Delete old files and backups you no longer need.
- 3. Clean out your downloads folder.
- 4. Remove any new widgets from the Dashboard.
- 5. Empty the trash.
Step 3. Backup Your Mac
Once you've cleaned up your Mac, it's time to backup your important files and data. There are two ways to do this: using Time Machine or creating a bootable clone.
Time Machine is macOS's built-in backup feature that will save copies of your files to an external hard drive. To use Time Machine, connect an external hard drive to your Mac. Once connected, open System Preferences > Time Machine and click 'Select Backup Disk'.
Creating a bootable clone of your macOS installation is another way to back up your Mac. This will create an exact copy of your macOS installation that you can boot from in case something goes wrong with the macOS update process. To create a bootable clone, you need to use a program like Carbon Copy Cloner or SuperDuper.
LEARN MORE
One of the reasons why it is suggested for Mac users to back up their computers before updating to a new OS is that some users meet a data loss case after a macOS update. So what happens when you update macOS? Click here to learn about Does Updating macOS Delete Everything?
Ⅲ. macOS Update Process 2. How to Update macOS - 4 Methods
Updating macOS not only promises your Mac to get the latest features and maintain the security, stability, compatibility, and performance but also helps your software keep up to date. And that's why Apple recommends you always use the latest macOS that is compatible with your Mac.
There are different cases of macOS upgrading. The most common one is users want to update from the previous macOS to the latest one, for example, from macOS Big Sur to macOS Monterey. Another common scenario is users don't keep updating the macOS, but they're attracted by the new features of the new macOS, so they want to leap to the latest macOS. The very last scene is about unsupported Mac models. For security concerns, some users would like to know if they can upgrade to the latest macOS, too.
This part will cover all the macOS update methods, and no matter which cases you are in, you could refer to this guide to update your Mac to the latest macOS.
Method 1. Update macOS from Software Update
Note: During the upgrading process, keep your Mac on and avoid closing its lid. Your Mac might restart and show a progress bar or blank screen several times. It might be easier to begin in the evening so installation can complete overnight.
(For macOS Catalina and later)
This is the easiest way to update macOS and is recommended for all users. To use this method, your Mac must be connected to the internet.
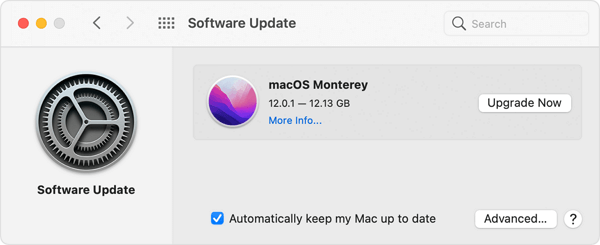
Step 1. Open System Preferences from the Apple menu.
Step 2. Select "Software Update" from the list of options.
Step 3. macOS will check for updates and prompt you to install them if they're available.
Step 4. Click "Upgrade Now" and follow the prompts to install any available updates.
Method 2. Update macOS from App Store
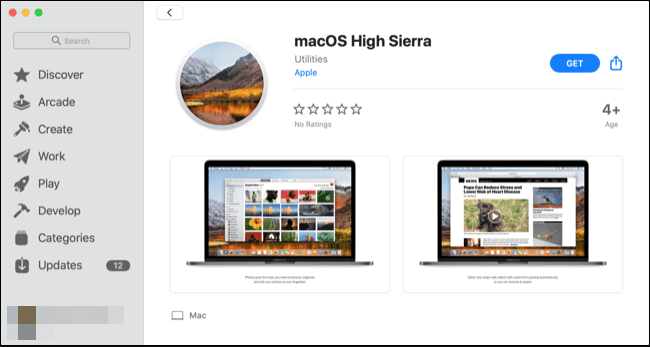
(For macOS Mojave or earlier)
If you're using macOS Mojave or earlier, you're likely can't see the available new OS version information in the Software Update. You can update macOS from the App Store instead:
Step 1. Open App Store and search the OS name you want to update. For example, search macOS Monterey.
Step 2. Click the best match search result, enter your Apple ID and the password, and the update process will start. Or you can download macOS Monterey from this link: macOS Monterey.
Method 3. How to Update from Old Version of macOS
When updating the macOS, there is another case that you can't update to the latest macOS directly. What if you want to experience new features and improve Mac speed and system stability with the latest macOS? This way, you need a litter detour to upgrade to an earlier macOS first and then upgrade to the newest macOS. This method works for users whose Mac is lower than OS X 10.9 (Mavericks). Here are the detailed steps.
Step 1. Directly download OS X El Capitan 10.11: How to get old versions of macOS.
Step 2. Follow the on-screen wizard to update your Mac to El Capitan first.
Step 3. Then search for the latest macOS in the App Store and follow the steps in Method 2 to finish OS upgrading.
Method 4. Install Latest macOS on Unsupported Mac
Every year when Apple releases a new macOS, it drops support for specific Mac models, and these models of Mac are not compatible with the latest macOS. However, the new macOS provides users greater speed, system stability, and robust security protection. The great news is that your unsupported Mac still has hope.
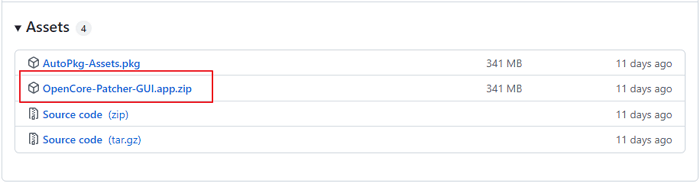
There is a software called OpenCore Legacy Patcher that could help you create a macOS installer. All you need to prepare is to download the latest version of OpenCore Legacy Patcher from this site. Be sure to choose the "GUI" version. And you also need to prepare a USB drive that is erasable and larger than 16GB.
After downloading and installing the utility, you could follow the steps in this article to install the latest macOS on an unsupported Mac. The whole process might seem a bit tedious, but take one step after another, and you can do it with patience.
Detailed Guide:
Bonus Update Tip: Enable/Disable Automatic macOS Update
You could enable the automatic macOS update feature if you don't want to miss any macOS updates. This way, your Mac will check and install updates automatically when they're released. Here's how:
Step 1. Open System Preferences from the Apple menu.
Step 2. Select "Software Update" from the list of options.
Step 3. Check the box next to "Automatically keep my Mac up to date."
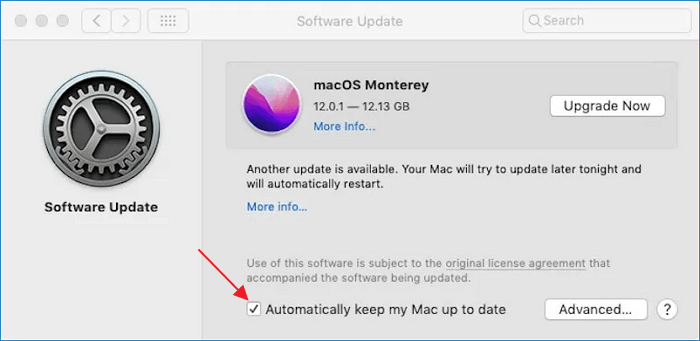
Note: If you want to receive updates for apps as well, click the Advanced button and tick the "Install app updates from the App Store." option.
Disable Automatic Updates on Mac
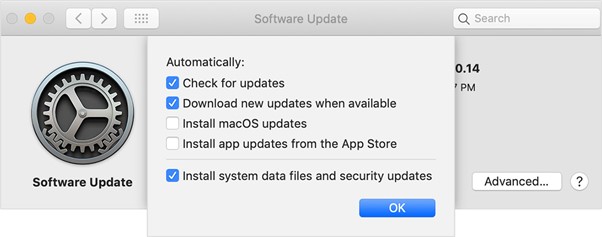
It is very easy to disable the automatic updates on Mac, as you already know how to enable it. Just unticking the option is good. However, if you check the "Advanced" option, you can see that once you choose to update your Mac automatically, you actually enable five things:
- Check for updates
- Download new updates when available
- Install macOS updates
- Install app updates from the App Store
- Install system data files and security updates
Macs empower every user to customize what they want to update automatically. You can only choose to update the OS or the apps by unticking the option.
Accidental OS updates can happen all the time; how to stop an in-progress updating on Mac? Here besides telling you how to disable macOS installation in progress, we will also tell you how to disable the macOS update permanently.
Stop macOS Installation in Progress
Step 1. Press and hold Command + Option + Esc.
Step 2. A Force Quit Application window will appear.
Step 3. Now click on Force Quit to stop the macOS installation.
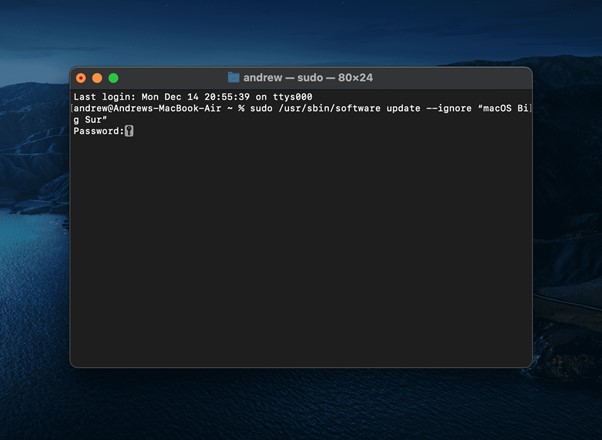
Disable macOS Update Permanently
Step 1. Open the Terminal app by pressing Command + Space or search Terminal through Spotlight search.
Step 2. Once the Terminal is opened, write the following command and hit Enter:
sudo /usr/sbin/softwareupdate --ignore"macOS [name of update]"
Step 3. Enter your Mac password and press the Enter key again.
Deep Data Recovery for Mac - No Data Loss after macOS Update
- Recover lost or deleted files, documents, photos, audio, music, and emails effectively
- Recover files from formatted external hard drive, emptied Trash, SD/memory card, flash drive, digital camera, and camcorders
- Support data recovery for sudden deletion, formatting, hard drive corruption, virus attack, system crash under different situations
Ⅳ. macOS Update vs. Clean Install: Should I Clean Install My Mac?
When talking about upgrading macOS, a commonly brought up question is: Is it better to clean install or directly update macOS? In this part, we are here to give you some insights. First, you should understand the concepts of clean installs and updates.
- Clean install macOS means you will wipe out all the existing data and settings on your Mac and start from scratch with a fresh installation of macOS.
- macOS update means directly upgrading from an older macOS to a newer version. This process does not harm your existing files, Apps, or system settings.
The advantage of a clean install is that it can help you fix various issues on macOS, like system slowdowns, performance issues, weird glitches, etc. And it would wipe out corrupt files or apps preventing macOS from running properly during the process. But it will take a longer time and will cause data loss. While the advantage of macOS updates is it takes less time, and you don't need to worry about data loss. But it takes much more storage space than a clean install.
In all, if your Mac is slow and has performance issues, on the premises of making a full backup, you should make a clean install. Otherwise, it is suggested you make a common update through Mac's Software Update.
MacOS Update VS. Clean Install: Which One to Choose?
Any OS gets slow with time, and when there is time to update, you always wonder if a clean install is a better idea? In this guide share the difference between macOS upgrade vs. clean install and which one you need to choose.

We have introduced how to update macOS in four different ways above. This part is for the users who prefer to make a clean install. We will give a detailed guide on how to make a clean install on macOS from a USB drive. This is probably the best method if you have already downloaded the installation file and don't want to wait hours to resume the download.
Preparation:
- A 16GB or larger erasable USB flash drive.
- Admin privileges for the Mac.
- A backup, just in case something goes wrong.
Step 1. Download macOS
First of all, to create a macOS installation USB drive, you should download the installation files. Download the macOS you need through the following links. Here we take macOS Monterey as an example:
Step 2. Create the Bootable Installer
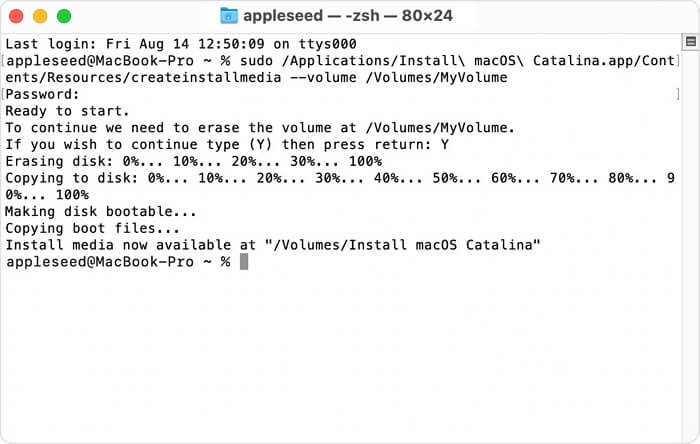
Now the prepared USB drive will come in handy. Connect your USB drive to your Mac, open Terminal, then copy and paste the following command line in Terminal. Install different macOS needs to enter different command lines, here we take macOS Monterey as an example.
Monterey:
sudo /Applications/Install\ macOS\ Monterey.app/Contents/Resources/createinstallmedia --volume /Volumes/MyVolume
Note: You may require to replace MyVolume in the command line with the real name of your USB flash drive.
After entering the command line, press Enter to start the creating process. The macOS will require you to enter the password of your computer, and the Terminal will tell you that it is about to erase the drive. Press Y or Return to agree to continue the process and wait for the bootable drive to be prepared.
Step 3. Install macOS from the Bootable Installer
The final step is to boot your Mac from the created bootable installer. The operation varies from the chips of your Mac, Apple silicon-based Mac and Intel processor-based Mac should follow two respectively methods.
- Tip
- In Mac's "About this Mac", you could see whether your Mac is Apple Silicon or Intel processor.
| Intel Macs | Apple Silicon Macs |
|---|---|
|
|
|
|
LEARN MORE
The steps above only show you how to make a clean install of macOS Monterey. Actually, due to the differences in Mac models, you can also update your Mac to macOS Big Sur or Catalina. If you want a more comprehensive guide on cleaning install macOS from USB, click here to get more information: 3 Steps to Clean Install macOS from USB.
Ⅴ. macOS Update Troubleshooting
Even though macOS updates usually go smoothly, there is always the possibility that something could go wrong. Common update error scenarios include Mac updates getting stuck in a process (checking for updates, downloading, Apple logo, etc.) and displaying error messages (installation failed, macOS cannot be installed on this disk, etc.).
The update error message indicates the upgrading failed at a particular point in time due to some reasons. Here are some macOS update troubleshooting tips that might help you fix macOS update errors.
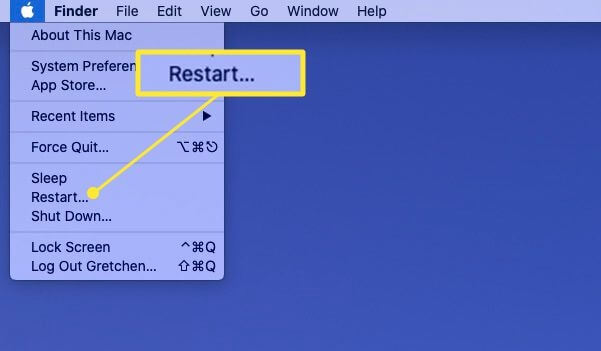
1. Restart your Mac and try again
Click the Apple icon on the menu bar and select "Restart" to reboot your Mac. Then try to click the "Upgrade Now" button from Software Update again to see if it works.
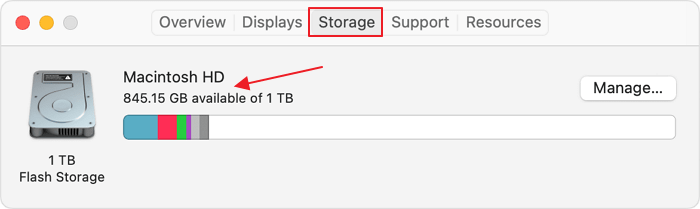
2. Check Free Storage Space
One of the factors that would influence the successfulness of a macOS update is if there is enough free space on the disk. The space required to upgrade to different versions of macOS is not necessarily the same, but you should at least ensure that there are about 50GB of free space on the disk before starting the upgrade.
To check free space on your Mac:
Click the Apple icon on the menu bar and select "About this Mac". Then on the opening window, switch to the "Storage" tab.
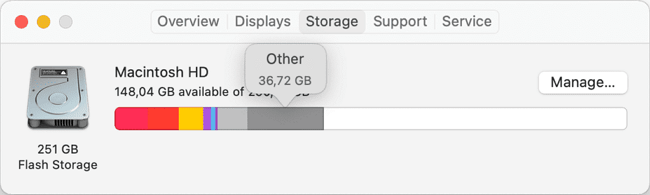
What Is the Other in My Mac Storage
If you check on your Mac computer, you can see that in the Storage tab, there is an item named Other. This Other item usually takes up at least several GB of space. But what is it? And how to remove it? This article will give you the answer.
3. Reset the Time and Date Settings
A wrong time and date can lead your system cannot connect to the Apple server. Follow the steps to reset.
Go to System Preference > Date & Time. Choose your time zone, and tick the option of "Set date and time automatically".
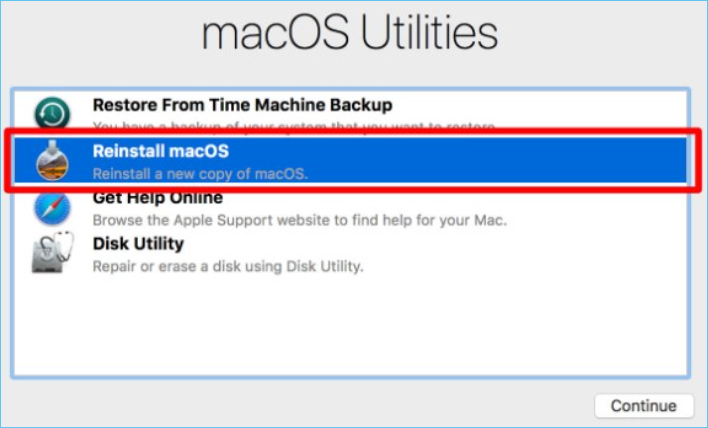
4. Update macOS in Recovery Mode
Step 1. Restart your Mac device. You can either press the power button or choose Restart from the Apple logo in the menu bar.
Step 2. While the computer is rebooting, press and hold the Command and R keys together. Hold them until the Apple logo appears on your screen, and then let go.
Step 3. Select Reinstall macOS in the macOS Utilities window, click Continue, and follow the onscreen instructions.
5. Clean Install macOS
The last resort is to try to make a clean install. However, a clean install will erase all existing files, data, apps, and settings on your Mac. Make sure you have backed up the whole Mac before updating.
You can refer to Part 4 to learn how to clean install macOS.
LEARN MORE
The above content gives general solutions to macOS update problems. If you want to know more specific information about the error message - macOS Can't Be Installed on This Disk. Click the linked page to get what you want.
News about macOS Ventura - 2022 Latest macOS
On June 6th, 2022, macOS Ventura was announced as the next generation of macOS. It will likely arrive in late October 2022. According to WWDC news, this new macOS only works with Mac 2017 and later machines. Although you can't try macOS Ventura until this fall, Apple seeded the second beta of macOS 13 on June 22nd. If you're in the Apple Developer project, you could download it and have a try!
Features of macOS Ventura
Stage Manager: automatically organizes open apps and windows so users can concentrate on their work and see everything in a single glance.
Continuity Camera: you could wirelessly use your iPhone's camera as a webcam so that your Mac gets the iPhone-exclusive Portrait Mode, Center Stage, and the new Studio Light.
Handoff comes to FaceTime: this allows you to start FaceTime on one Apple device and seamlessly transfer it to another Apple device nearby, such as the Mac.
For more detail about macOS Ventura, check this link from 9to5mac: macOS 13 Ventura: New features, compatibility, release date.
Related Articles
- Word Recovery for Unsaved, Deleted, and Corrupted Word Documents [Professional Guide]
- (July 2022) Ultimate Guide to Mac Time Machine Backup
- Windows Repair Tools and Services [Windows 10/11]
- Ultimate Guide on SD Card Recovery in 2022